![]()
![]()
![]()


For Indigo 6
Like all Indigo Server plugins, installation is as simple as double-clicking the plugin’s icon in the Finder. Indigo will prompt you to install, and optionally enable the plugin.
Before attempting to create a new ColorTouch Thermostat Device in Indigo, you should ensure that your thermostat is installed, powered up, and properly configured for use with your HVAC system. Refer to the ColorTouch Owners Manual and Installation Instructions booklet that came with the thermostat. You can also download a PDF version directly from Venstar.
Also, you’ll want to ensure that:
- the thermostat has been updated with the latest firmware version (the plugin was written against API v4, and has not been tested with earlier versions).
- the SkyPort Wi-Fi Key has been properly installed and configured for use with your Wi-Fi network. It is strongly recommended that you configure your thermostat with a static IP address so that the plugin can reliably communicate with it. Make a note of the IP address used, as it is required during the initial device configuration in Indigo (more below).
- the “Local API” option is turned on in the thermostat’s “Accessories Menu” (it is OFF by default). If you do not turn on this option, the plugin will be unable to communicate with the thermostat.
- The “Skyport Service” option is not required, and may be turned off in the thermostat’s “Accessories Menu” if you don’t wish to use it (it is ON by default). The plugin has not been tested with the Skyport Service enabled, but I can see no reason why one would interfere with the other. If you elect to use the Skyport Service, I would appreciate your feedback regarding any effects on the plugin or its ability access to the thermostat via Wi-Fi. I’ll update these notes accordingly.
Once the thermostat hardware is properly configured, create a new ColorTouch Thermostat Device in Indigo as you would any other new Indigo Device. Choose File —> New Device… from the Indigo Client’s menu bar. The “Create New Device” dialog, pictured below, will appear.
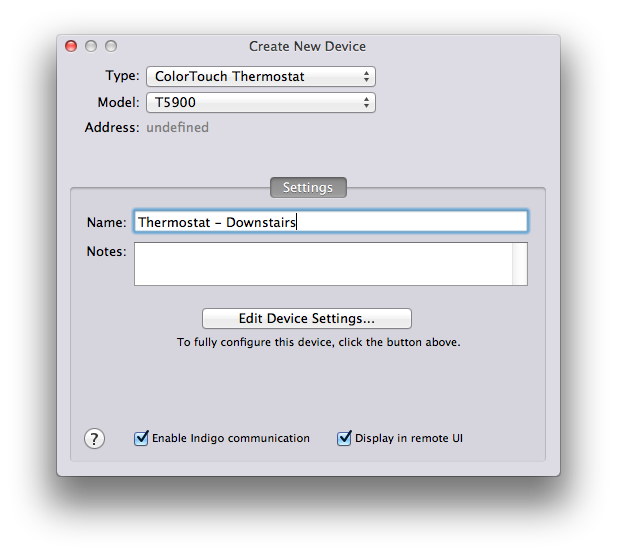
Choose “ColorTouch Thermostat” from the “Type:” popup menu. Enter a name for the new device, and optionally, any desired Notes. Next, choose the appropriate model number (T5800 or T5900) from the “Model:” popup menu. The configuration dialog, pictured below, should appear automatically. If it doesn’t, click the “Edit Device Settings…” button:
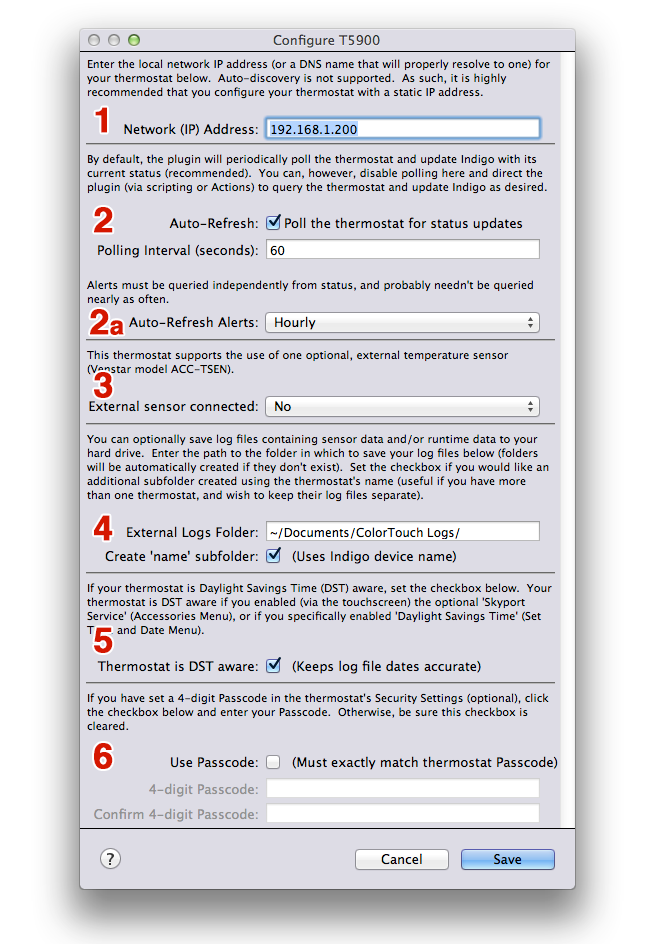
- Enter the IP address of your thermostat (or a DNS name that will properly resolve to it). As stated above, it is highly recommended that you assign the thermostat a static IP address. If you allow your router to assign the thermostat an IP address automatically (via DHCP), the address will likely change each time the thermostat and/or the router reboots. If the address changes, the plugin will be unable to communicate with the thermostat until you edit the settings above to reflect the new address.
- By default, the plugin will periodically poll the thermostat and update the Indigo Server with its current status (recommended). You can, however, disable polling here and direct the plugin (via scripting or Actions) to query the thermostat and update the Indigo Server as desired. By default, the plugin will poll the thermostat every 60 seconds — a very slow, conservative rate. The polling interval can be adjusted as desired. A lower number (higher frequency), will poll the thermostat more frequently and make the plugin more responsive to changes in the thermostat’s status, but will will slightly increase traffic over your Wi-Fi network and CPU usage on your Mac. Adjust to suit your tastes and available bandwidth/CPU resources*.
- Alerts are queried separately from sensors and status, and needn’t be queried as frequently. Again, adjust to suit your tastes. Alerts can also be independently queried via scripting or Actions. As such, you can optionally disable Auto-Refresh Alerts here and query them via Actions or scripting using the timing method and polling interval of your choice.
- Alerts are queried separately from sensors and status, and needn’t be queried as frequently. Again, adjust to suit your tastes. Alerts can also be independently queried via scripting or Actions. As such, you can optionally disable Auto-Refresh Alerts here and query them via Actions or scripting using the timing method and polling interval of your choice.
- The ColorTouch Thermostat supports one (and only one) additional, external temperature sensor (Venstar model number ACC-TSEN, sold separately). If you have one connected to this thermostat, choose “Yes” from the “External sensor connected” popup menu. Otherwise, leave it set to “No”, the default.
- You can optionally save Runtime data and/or Sensor data to log files on your hard drive. Log files will be stored in the folder specified; all log files & folders will be created automatically, if they don’t exist. You can change the log folder to any folder on your Mac (the one running the Indigo Server) to which the current user has write privileges. Check the “Create ‘name’ subfolder” checkbox to have the plugin save log files for each thermostat device to a subfolder named after the device (using the Indigo Device Name you assigned, above — not the Onboard Name which is saved to the thermostat itself via the touchscreen). This is helpful if you have multiple ColorTouch thermostats, and you wish to store their log files separately.
- In order to properly interpret time-stamped information received from the thermostat, the plugin needs to know if your thermostat is configured to be aware of Daylight Saving Time (DST). Your thermostat will be DST-aware only if you have enabled either of the following features via the thermostat’s touchscreen menus:
- The optional Skyport Service, which is ON by default. It will be used to automatically set the date and time on the thermostat, and the thermostat’s “Set Time and Date” menu will be disabled. It will also automatically adjust the thermostat’s time for DST.
OR - You have specifically enabled the “Daylight Savings Time” setting in the thermostat’s “Set Time and Date” menu.
- The optional Skyport Service, which is ON by default. It will be used to automatically set the date and time on the thermostat, and the thermostat’s “Set Time and Date” menu will be disabled. It will also automatically adjust the thermostat’s time for DST.
- Finally, if you created a 4-digit security PIN code to enable the thermostat’s screen-lock feature, you must enter the same code into the spaces provided, or the thermostat will reject any attempt by the plugin to control it (though, it can still be queried for status updates).
*Obligatory fine print — a note about polling. I’m not sure why, but this is one of those touchy subjects, like politics or religion, that many people seem to enjoy debating endlessly, and with the utmost passion. I’m not one of them. The quite-lazy default polling interval of once-every-sixty-seconds was selected in hopes of staving off the inevitable howls of protest over excessive use of precious Wi-Fi bandwidth and limited CPU resources on the Indigo Server Mac. Feel free to experiment and see what works best for your situation and your needs; no one is better suited to determine what’s best for your setup than you. I can, however, say this with confidence: after nearly two months of testing, and with the plugin running all day every day, I have settled on 2 seconds as my preferred polling interval, though it's important to note that I have only one ColorTouch thermostat at present. And to be honest, there was a bug in the plugin that actually had it polling the thermostat once per second for quite some time before it was corrected. Neither the thermostat, the plugin, the Indigo Server, or the Mac ever complained or crashed, and never once did the thermostat (or Indigo, or the Mac, for that matter) fail to respond as expected. The ColorTouch’s onboard web server is quite responsive, and it appears to be very robust. Which is definitely more than I can say for certain other thermostats I have recently thrown away. Your mileage may vary. Use at your own risk. Ask your doctor if you’re healthy enough for high-frequency polling, yadda, yadda, yaddda…</rant>